Coding serial on the micro:bit
You can send and receive data over serial on the micro:bit using both Python and Makecode for micro:bit.
Python
In Python, the 'print' statement sends a string from the micro:bit to the connected computer over serial. You can read serial messages from the computer using the UART module.
Makecode for micro:bit
You can read or write serial data in JavaScript Blocks using the advanced serial blocks.

Using serial on the computer
Once you have programmed your micro:bit you will need a way of sending and receiving serial data on the connected computer using one of these options:
- In the Chrome browser with WebUSB
- Using the Mu Python Editor program
- Using a computer terminal or serial program.
WebUSB
WebUSB allows you to read serial data in your web browser using the Python or JavaScript Blocks editors. WebUSB is still in beta; we're currently looking for help testing it, and we'd love for you to get involved.
Both editors allow you to stream and plot serial data in-browser. The Python editor also features REPL (Read-Eval-Print-Loop), allowing you to write & test code on your micro:bit in real-time.
Note that WebUSB is currently only supported by Chrome.
Discover how to use WebUSB in this knowledge base article.
Using MakeCode
MakeCode allows you to read and plot serial data from the micro:bit, allowing you to accurately log data from the device's sensors.
Connect your micro:bit to the computer with a USB cable then open makecode.microbit.org in a Chrome-based browser. Write a program using the serial blocks and flash it to the micro:bit, then click Show console Device to view a plot of serial data. Clicking the blue button in the right corner will generate a CSV file, which allows you to view and edit the serial data in Excel.

Read this guide to learn more.
Using Mu
The Mu editor for Python allows you to read and plot serial input, and also features REPL (Read-Eval-Print-Loop), allowing you to write & test code on your micro:bit in real-time. Click the REPL button to view raw output from the device, or click Plotter to see a live plot of data from the device
Using a computer terminal
Windows
You can use any terminal emulator program to send and receive data to and from the micro:bit over the USB serial lead.
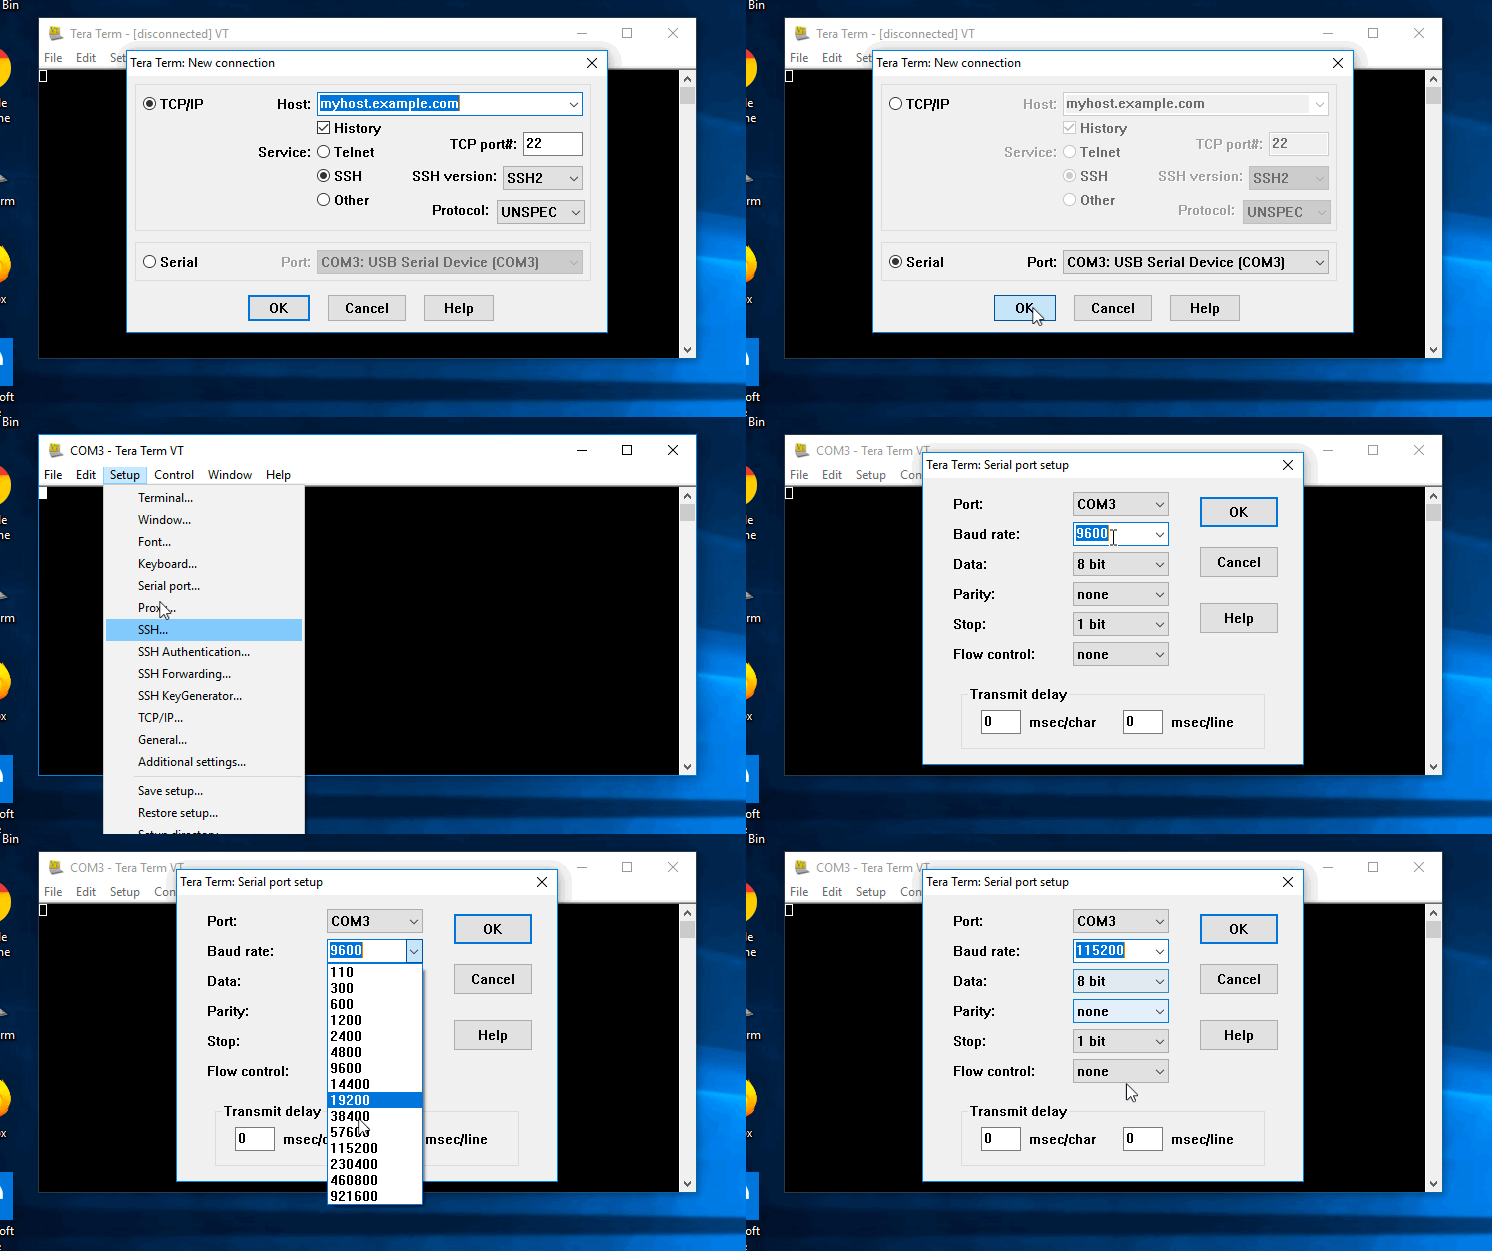
For example in Tera Term:

- Plug in micro:bit and open Tera Term
- Select Serial as the port
- Choose Setup > Serial port from the setting menu and configure these settings:
- Baud rate = 115200
- Data = 8 bits
- Parity = none
- Stop = 1 bit
You should now see serial data output in the console.
Mac OS
- Plug in the micro:bit and open a new terminal window.
- Type
ls /dev/cu.*to get a list of connected serial devices; one of them will look like/dev/cu.usbmodem1422(the exact number depends on your computer). - Type
screen /dev/cu.usbmodem1422 115200, replacing the 'usbmodem' number with the number you found in the previous step. This will open the micro:bit's serial output and show all messages received from the device. - To exit, press Ctrl-A then Ctrl-D.
Linux
- Plug in the micro:bit and open a new terminal window.
- Typing
dmesg | tailwill shows you which/dev/node the micro:bit was assigned (e.g./dev/ttyACM0). - Type
sudo screen /dev/tty0 115200, replacing the number with the number you found in the previous step. You may need to install thescreenprogram if you don't already have it. - To exit, press Ctrl-A then Ctrl-D.
Further Information
- mBed documentation
- CoolTerm cross-platform console viewer
- One way of handling serial is using the pyserial module for Python. Note that this module is not developed or maintained by the Micro:bit Educational Foundation, so please see the pyserial documentation for support and setup instructions.
- Another way of handling serial is with Node. See this hackster make for Mac or this make for Windows for more on how to use Node for handling serial.
- Makecode docs on serial
Keywords for search: USB, serial port, Windows, REPL, Mu
